
Welcome to this tutorial on customizing the Transaction Line Editor in Salesforce Revenue Lifecycle Management!
In this guide, we’ll walk through the steps to add, remove, and reorder columns and fields in the Transaction Line Editor, which is an essential tool for managing quotes and orders in Salesforce.
What is the Transaction Line Editor?

The Transaction Line Editor is a key component in Salesforce Revenue Lifecycle Management that allows users to view and edit line items on quotes and orders. By default, it displays a set of predefined columns and fields, but you can customize these to fit your specific business needs.
Steps to Customize the Transaction Line Editor
1. Access the Page Editor
To begin customizing the Transaction Line Editor, follow these steps:
- Navigate to a Quote or Order Record: In Salesforce, open any existing quote or order where you want to modify the Transaction Line Editor.
- Edit the Page: Click the gear icon (⚙️) in the top right corner and select Edit Page from the dropdown menu. This will open the Lightning App Builder.
2. Locate the Transaction Line Editor Component
In the Lightning App Builder, you’ll see the layout of your page. Find the Transaction Line Editor component, which is usually a part of the central section of the page layout.
- Click on the Transaction Line Editor: This action will open the properties pane on the right side of the screen.
3. Modify the Displayed Columns
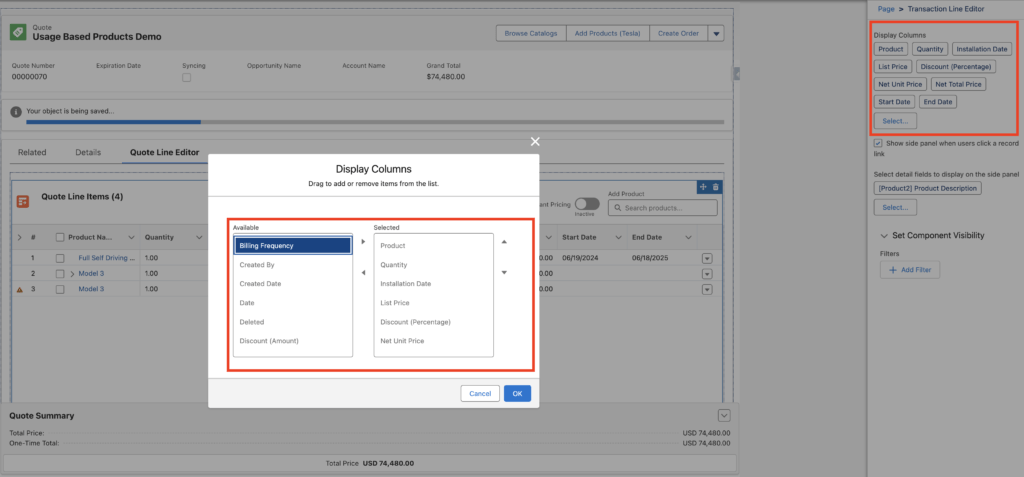
In the properties pane, you can see the currently displayed columns and their order. To modify these:
- Select Columns: Click the Select button below the ‘Display Columns’ section. This will open a dialog where you can choose from the available fields.
- Add a Field: To add a new field, find it in the list, click on it and hit the arrow to bring it into the selected fields. For example, if you created a custom field like “Minimum Usage,” you can find and select it here.
- Reorder Fields: Use the ‘Up/Down’ arrows to reorder the selected fields. Place the new field in your desired position. For instance, if you want “Minimum Usage” to appear right after “Quantity,” drag it to that spot.
- Save Your Changes: Once you’re satisfied with the order and selection of columns, click OK.
4. Preview and Save Changes
After adjusting the columns:
- Preview the Changes: The editor preview will update to show how the new column configuration looks.
- Save the Page: Click the Save button at the top right of the page editor to apply your changes.
- Activate the Changes: If this layout is not yet active, you might need to activate it. Follow the prompts to activate the layout for the relevant profiles or apps.
5. Verify the Changes
Go back to your quote or order page to ensure that the changes have been applied correctly. You should see the new columns in the order you specified, and any added fields should now be editable if they are configured to be so.
Additional Resources
For more detailed instructions and advanced customization options, refer to the Salesforce Help Documentation.
Feel free to reach out with any questions or comments. Happy customizing!