
Term-based discounts were a popular feature in Salesforce CPQ managed package, allowing businesses to offer better pricing for longer subscription commitments. While this functionality isn’t available out-of-the-box in Revenue Cloud core, you can recreate it entirely using point-and-click configuration with decision tables, price adjustment matrices, and formula-based pricing.
In this guide, I’ll walk you through the complete implementation step-by-step.

Use Case
You want to offer discounts based on subscription length:
| Term Length | Discount |
|---|---|
| 0-12 months | 0% |
| 12-24 months | 10% |
| 25-36 months | 15% |
| 37+ months | 20% |
The longer the customer commits, the better the discount they receive.

Prerequisites
Before starting, ensure you have:
- Salesforce Revenue Cloud enabled in your org
- An active pricing procedure
- An active sales transaction context definition
- System Administrator access or equivalent permissions
Step 1: Create the Term Discounts Custom Object
First, we need a custom object to store our term discount tiers.
Object Configuration
Create a new custom object called Term_Discounts__c with the following settings:
- Label: Term Discount
- Plural Label: Term Discounts
- Name Field: Auto Number (e.g.,
TD-{0000}) - Enable: Allow Reports, Track Field History
Custom Fields
Add the following fields to the object:
| Field Label | API Name | Type | Description |
|---|---|---|---|
| Lower Bound | Lower_Bound__c |
Number(18,0) | Minimum months for this tier |
| Upper Bound | Upper_Bound__c |
Number(18,0) | Maximum months for this tier (optional for last tier) |
| Discount | Discount__c |
Percent(16,2) | Discount percentage to apply |
| Tier Type | Tier_Type__c |
Picklist | Values: Percentage, Amount |
Sample Data
Create records for your discount tiers:
| Lower Bound | Upper Bound | Discount | Tier Type |
|---|---|---|---|
| 12 | 24 | 10% | Percentage |
| 25 | 36 | 15% | Percentage |
| 37 | (blank) | 20% | Percentage |
Note: Leave Upper Bound blank for the last tier to catch all terms 37 months and above.
Step 2: Create the Quote Line Item Field
We need a field on Quote Line Item to store the calculated number of months.
Create a new field on the Quote Line Item object:
| Field Label | API Name | Type |
|---|---|---|
| Number of Months | Number_of_Months__c |
Number(18,0) |
This field will be populated by a formula element in the pricing procedure.
Step 3: Create the Decision Table
Decision tables allow the pricing procedure to look up values from your custom object.
Create the Decision Table
- Go to Setup → Decision Tables
- Click New
- Configure:
- Name: Term Discounts
- Decision Table Type: Standard
- Click Save and Next
Configure Source Object
- Source Object: Term_Discounts__c
Configure Source Fields (Conditions)
Add two condition fields:
| Source Field | Comparison | Optional |
|---|---|---|
| Lower_Bound__c | Greater or Equal | No |
| Upper_Bound__c | Less or Equal | Yes |
Important: Make Upper Bound optional because the last tier won’t have an upper limit.
Configure Output Fields
Select the fields to return:
Discount__cTier_Type__c
Activate the Decision Table
After saving, click Activate to make the decision table available. This also refreshes the table data.
Step 4: Add Decision Table to Pricing Recipe
- Go to Setup → Pricing Recipes
- Edit your active pricing recipe
- Find your new Term Discounts decision table
- Click the + button to add it
- Set Pricing Component Type to Custom Discount
- Save
Step 5: Update Context Definition
The context definition maps your custom field so it’s accessible in the pricing procedure.
Add the Attribute
- Go to Setup → Context Definitions
- Edit your Active Sales Transaction Context
- Go to Edit Attributes
- Under Sales Transaction Item, add a new attribute:
- Name: Number of Months
- Type: Input and Output
- Data Type: Number
- Add a Tag for the attribute (e.g.,
NumberOfMonths) - Save
Map the Field
- In the context definition, go to Quote Entities Mapping
- Find Number of Months attribute on the left
- Map it to Quote Line Item →
Number_of_Months__con the right - Save and Publish
Step 6: Update the Pricing Procedure
Now we’ll add the formula and price adjustment matrix to the pricing procedure.
Deactivate the Pricing Procedure
Before making changes, deactivate your active pricing procedure.
Add the Formula Element

Add a Formula element to calculate the number of months:
Output Variable: Number of Months
Formula:
ROUND(MONTHS_BETWEEN({!Effective_To}, {!Effective_From}), 0)This formula calculates the difference in months between the subscription start and end dates.
Add the Price Adjustment Matrix
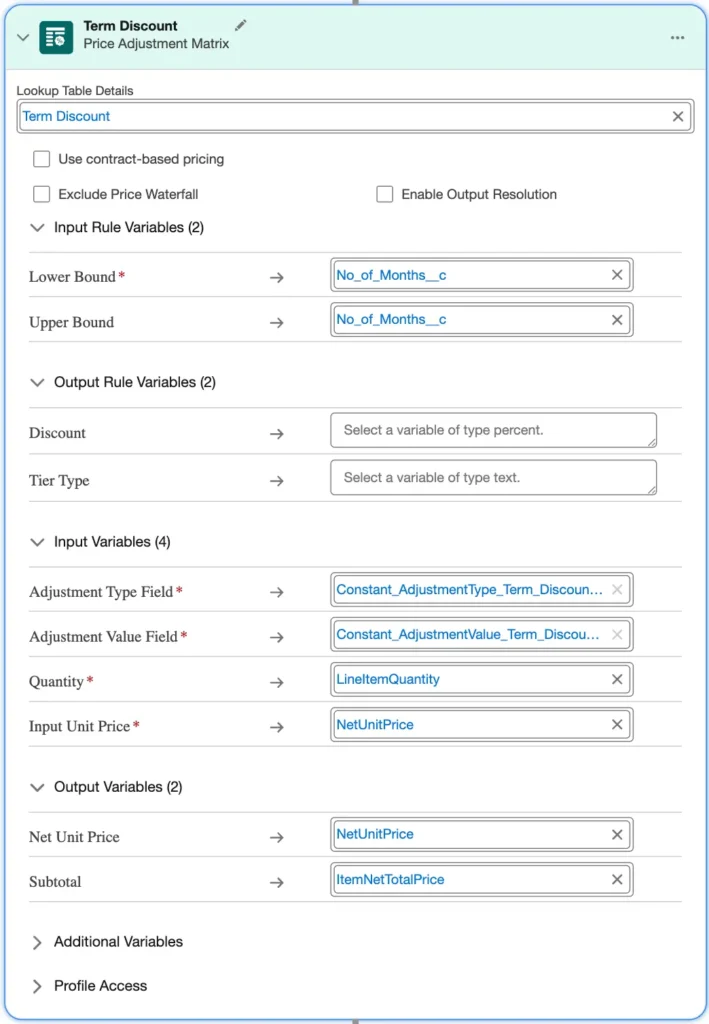
- Add a List Container (or use an existing one)
- Inside the container, add a Price Adjustment Matrix element
- Configure:
Lookup Table: Term Discounts
Input Rule Variables:
| Variable | Maps To |
|---|---|
| Lower Bound | Number of Months |
| Upper Bound | Number of Months |
Input Variables:
| Variable | Maps To |
|---|---|
| Quantity | Line Item Quantity |
| Input Unit Price | Net Unit Price |
Output Variables:
| Variable | Maps To |
|---|---|
| Output | Net Unit Price |
| Subtotal | Item Net Total Price |
Configure the Constants
The price adjustment matrix creates constants for the adjustment type and value. Update these:
- Find the constants named after your decision table (e.g.,
Term_Discounts_Adjustment_Type) - Set Adjustment Type constant to:
Tier_Type__c - Set Adjustment Value constant to:
Discount__c
Rename the Element
Rename the price adjustment matrix to Term Discount – this name appears in the price waterfall.
Reactivate
Save and reactivate the pricing procedure.
Testing Your Implementation

- Create a new Quote
- Add a subscription product to the quote
- Set the subscription term:
- For a 12-month term, expect 0% discount
- For a 24-month term, expect 10% discount
- For a 36-month term, expect 15% discount
- For a 48-month term, expect 20% discount
- Check the Price Waterfall on the line item to see the term discount applied
Example
For a product with:
- List Price: $1,000/month
- Term: 24 months
You should see:
- List Price: $1,000
- Term Discount: -10% (-$100)
- Net Unit Price: $900
- Subtotal: $21,600 (24 × $900)
Extending the Solution
This implementation can be customized for more complex scenarios:
Product-Specific Discounts
Add a Product lookup field to your Term_Discounts__c object and update the decision table conditions to filter by product.
Account-Based Discounts
Add an Account lookup to offer different term discounts based on customer tier or segment.
Amount-Based Discounts
Use the Amount tier type instead of Percentage to apply fixed dollar discounts.
Multiple Discount Tiers
Create additional custom objects and decision tables for different discount types that can stack.
Summary
In this guide, we recreated CPQ’s term discount functionality in Revenue Cloud using:
- Custom Object – To store discount tier configuration
- Decision Table – To look up the appropriate discount
- Context Definition – To map our custom field
- Formula Element – To calculate subscription duration
- Price Adjustment Matrix – To apply the discount
This approach is entirely point-and-click and can be extended to handle complex pricing scenarios.
Watch the full video tutorial: Term Discounts in Revenue Cloud
Questions? Leave a comment below or reach out on LinkedIn.
The Cloud Update | Agentforce Revenue Management